Auf dem überfüllten eCommerce-Markt ist die Gewinnung von Besuchern nur die halbe Miete - die effektive Monetarisierung ist das, was zu echten Ergebnissen führt. In diesem Artikel wird ein echter Fall vorgestellt, bei dem eine Kampagne auf HilltopAds $4,565 in nur 6 Tagen. Sie lernen, wie Sie Ihre Kampagne richtig einrichten, den Traffic optimieren und häufige Fehler vermeiden, um Ihre Gewinne zu maximieren.
Die wichtigsten Punkte der Fallstudie
Angebot: eCommerce
Quelle des Angebots: Direktwerber
Quelle des Verkehrs: HilltopAds
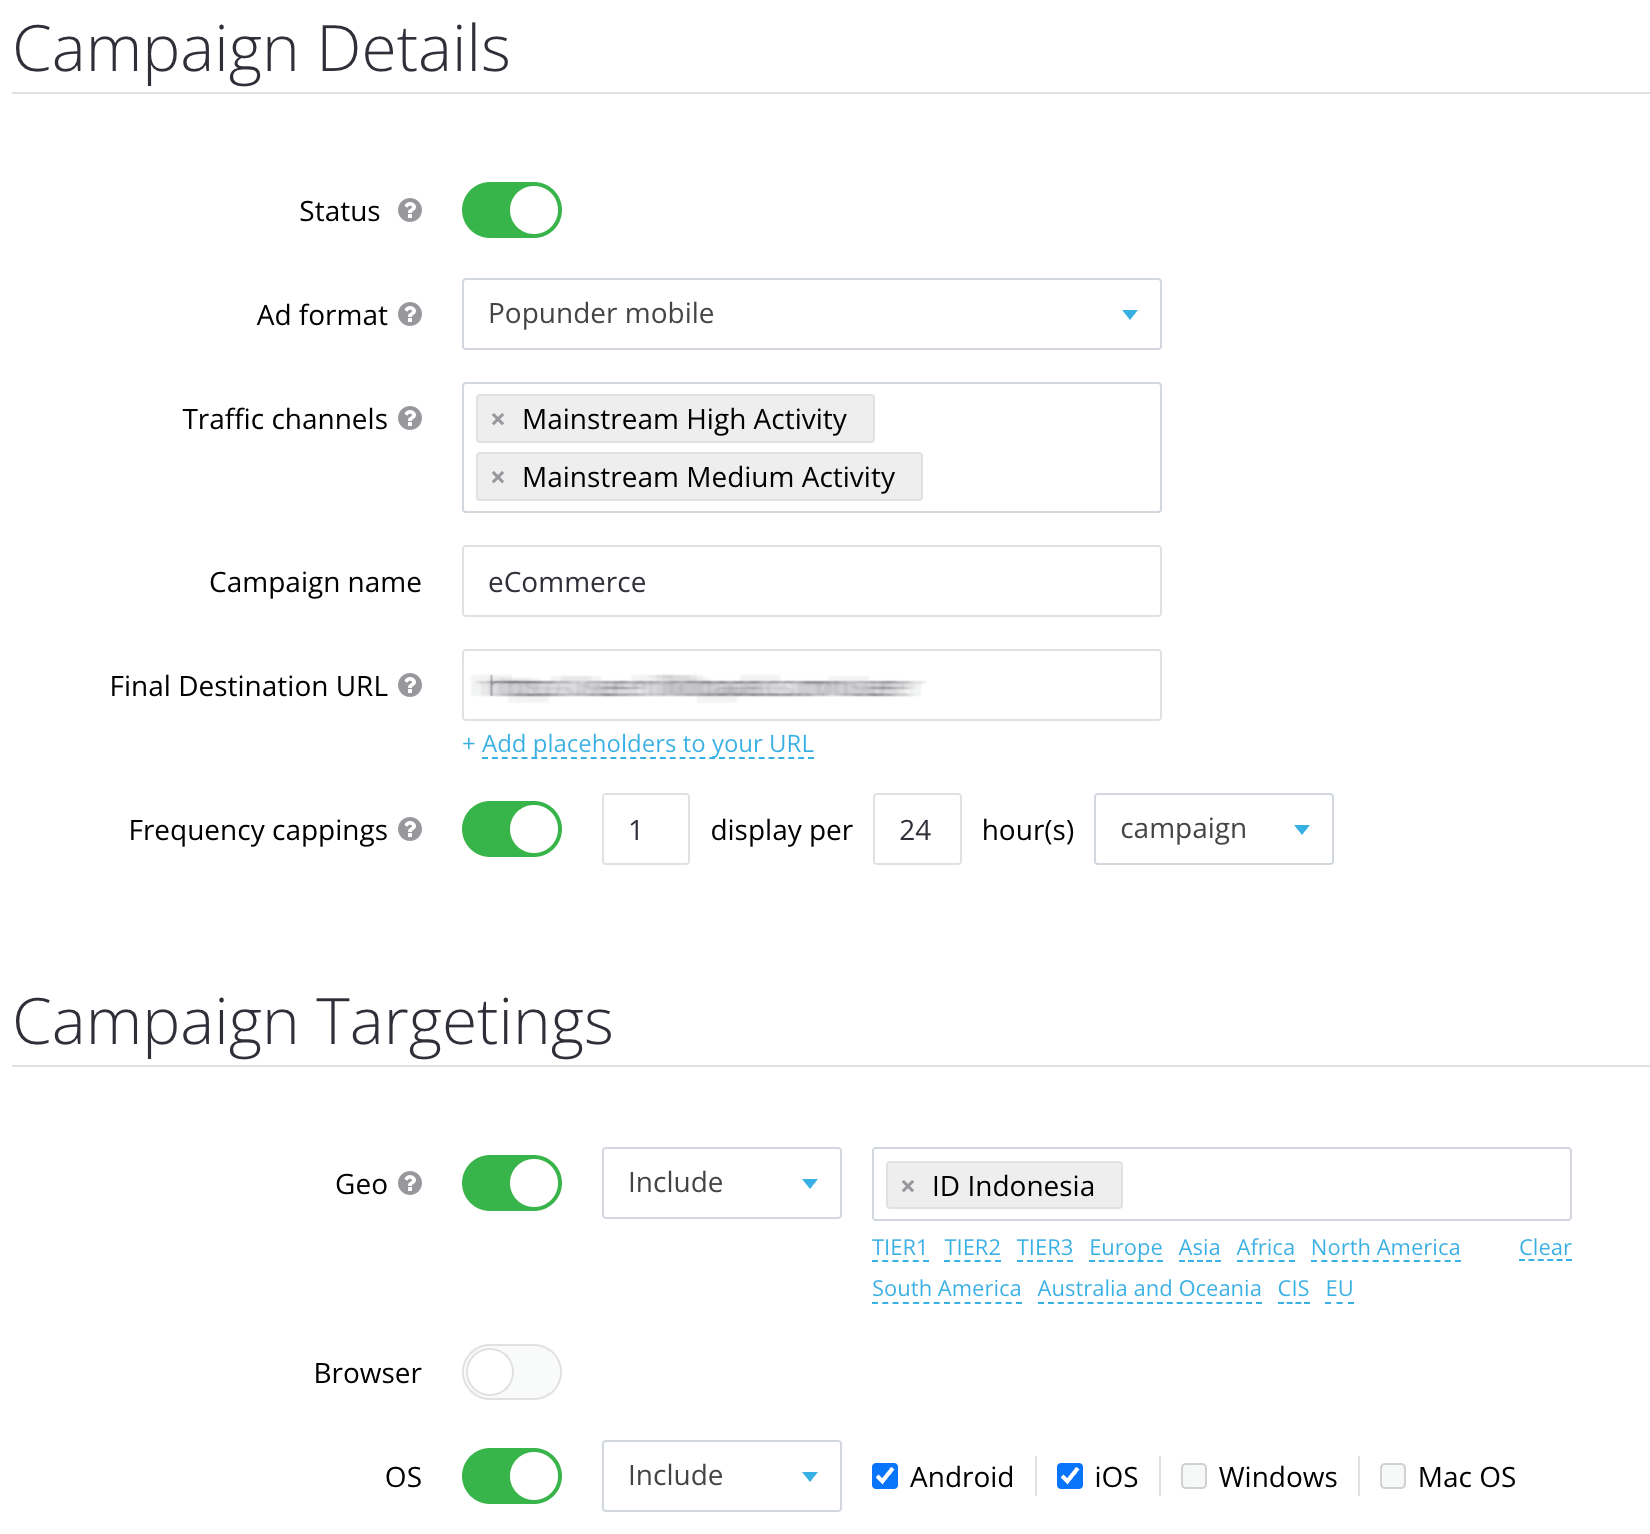
Anzeigenformat: Popunder mobil
Zeitraum der Werbekampagne: 23. bis 28. November
GEO: ID
OS: Android und iOS
Verkehrskanal: Mainstream hohe und mittlere Aktivität
Die Ausgaben: $1 770,56
Umrechnungen: 3 578
Die Einnahmen: $4 565,7
ROI: 157,87%

Melden Sie sich jetzt für HilltopAds an
und vielleicht wird der nächste Fall von Ihrer Erfolgsgeschichte handeln.
Einstellungen der Anzeigenkampagne und ihre Optimierung bei HilltopAds
Bevor Sie eine Werbekampagne auf HilltopAds starten können, müssen Sie sich als Werbetreibender registrieren. Sie können sich registrieren über dieser Link. Um eine Werbekampagne zu erstellen, müssen Sie Folgendes tun:
- Gehen Sie zum Kampagnen verwalten Abschnitt;
- Klicken Sie auf die Kampagne hinzufügen Taste;
- Wählen Sie im Bereich Kampagnenerstellung die Option Popunder mobil Anzeigenformat;
- In der Verkehrskanäle Abschnitt, wählen Sie Mainstream hohe und mittlere Aktivität.
Als Nächstes müssen Sie das Postback einrichten, um die Ergebnisse Ihrer Anzeigenkampagne zu verfolgen. Eine detaillierte Beschreibung der Arbeit mit Postback und den verfügbaren Platzhaltern finden Sie in unserem Leitfaden.
Vereinfacht ausgedrückt, müssen wir für die endgültige URL des Angebots Parameter zur Übergabe von Conversions und Quell-IDs einfügen. Der Parameter für die Übergabe von Conversions ist click_id, und die Quell-ID ist zone_id. Als Ergebnis sollte unsere Endziel-URL wie folgt aussehen:
https://my_offer.net/?&click_id={{ctoken}}&s1={{zoneid}}
- {{ctoken}} - HilltopAds-Parameter zur Übergabe von Konvertierungen.
- {{zoneid}} - HilltopAds-Parameter zur Übergabe der Quell-ID.
Im Allgemeinen können Sie absolut jeden Parameter aus den verfügbaren Optionen hinzufügen, der für die weitere Analyse der Kampagne erforderlich ist. Denken Sie jedoch daran, dass es wichtig ist, die klick_id Parameter in der endgültigen Verknüpfung, um Konvertierungen zu übergeben.
Als nächstes haben wir die Anzeigenhäufigkeit pro Nutzer festgelegt - 1 Anzeige in 24 Stunden. Und wir haben die notwendigen Targeting-Einstellungen festgelegt:
- GEO - ID (Indonesien)
- OS - Android und iOS

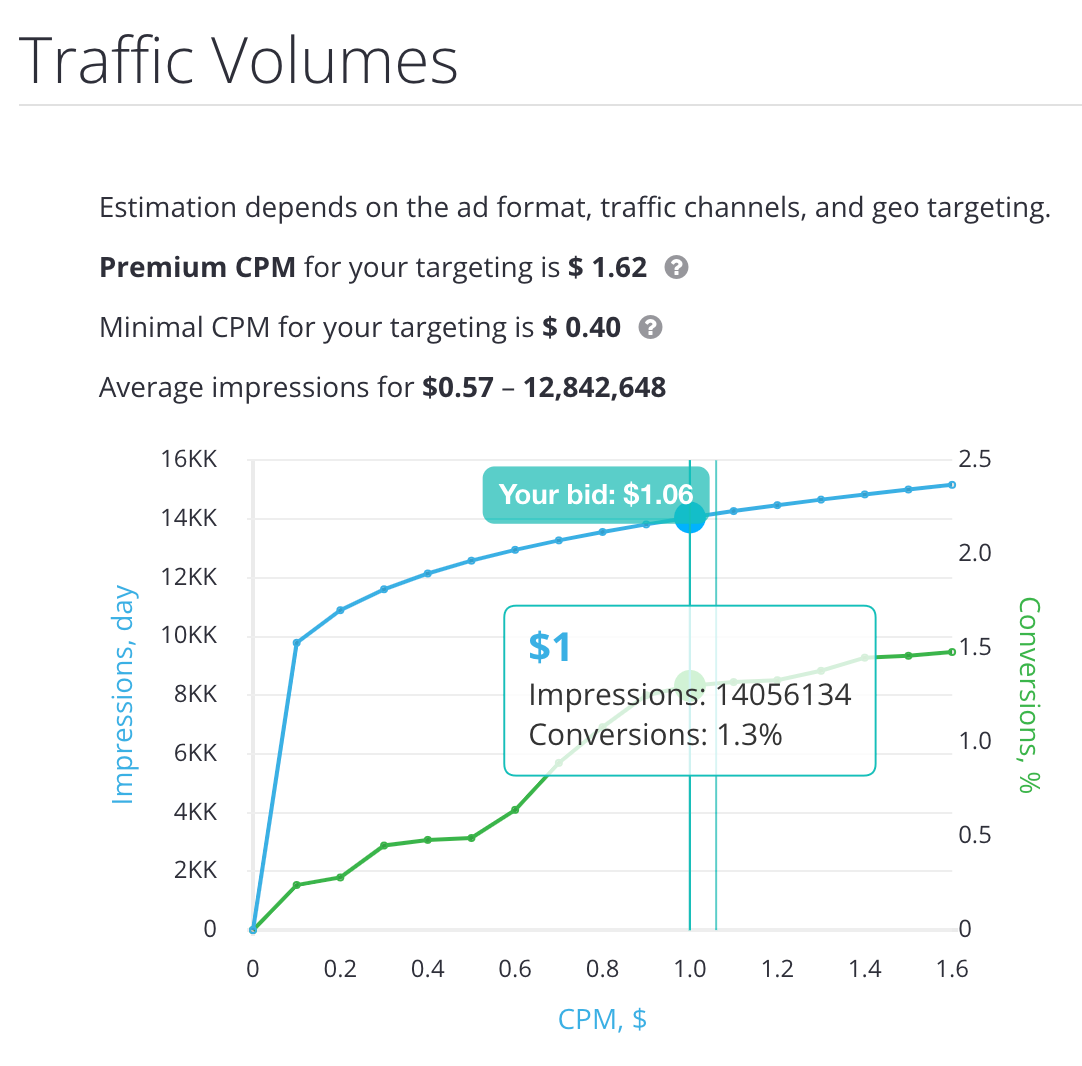
Bei Bedarf können Sie auch Kampagnenlimits oder Anzeigezeitpläne festlegen. Der letzte Schritt vor dem Start der Anzeige ist die Angabe der Kosten pro tausend Impressionen (CPM). Hier achten wir auf die Verkehrsaufkommen Diagramm in der oberen rechten Ecke, das die Premium-, Mindest- und empfohlenen CPM-Raten auf der Grundlage des ausgewählten Anzeigenformats, der Targeting-Einstellungen und des Traffic-Kanals berechnet.
Wir starteten die Anzeigenkampagne mit einem Gebot von $1,06, basierend auf dem empfohlenen Preis von CPM.

Starten Sie Ihre Werbeunternehmen mit HilltopAds!


Vor dem Start einer eCommerce-Werbekampagnehaben wir ein Auto-Optimierungs-Tool eingerichtet. Wir empfehlen Ihnen, einen längeren Optimierungszeitraum als für andere Angebote einzurichten (mindestens 96 Stunden), da Sie die ersten bestätigten Konversionen 3-5 Tage nach dem Start der Kampagne erhalten. Bestätigte Conversions für eCommerce-Angebote sind bezahlte und eingegangene Bestellungen. Außerdem empfehlen wir Ihnen, für eCommerce-Angebote in Indonesien die Quellen auf der Grundlage von Impressionen zu optimieren.
Auto-Optimierung ist ein Tool zum automatischen Hinzufügen von nicht leistungsfähigen Traffic-Quellen. Dank dieser Funktion entfernt das HilltopAds-System unrentable Quellen aus Ihrer Werbekampagne und fügt sie der BlackList hinzu.
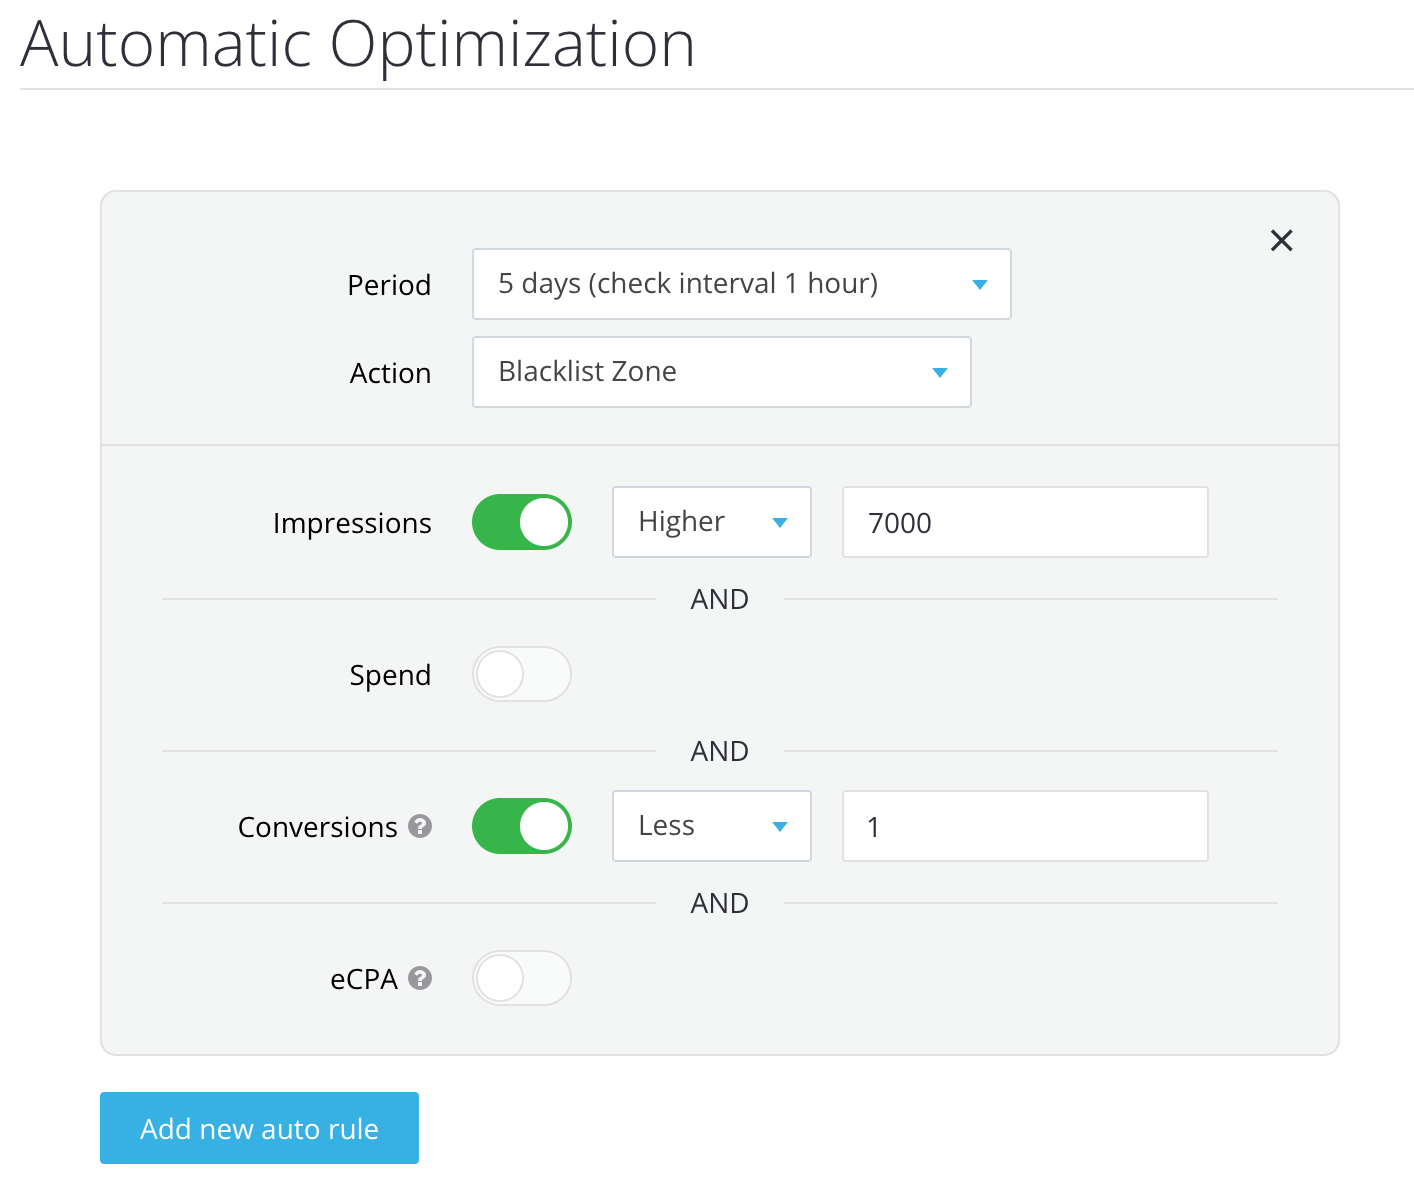
Daher haben wir die automatische Optimierung nach den folgenden Regeln konfiguriert: Der Optimierungszeitraum beträgt 120 Stunden (5 Tage), und wenn eine bestimmte Quell-ID mehr als 7 000 Anzeigenimpressionen hat und weniger als eine Konversion generiert, wird diese Quell-ID (Zone) automatisch zur BlackList hinzugefügt.

Die wichtigsten Einstellungen der Werbekampagne sind also wie folgt:
Anzeigenformat - Popunder mobil
Verkehrskanäle - Mainstream Hohe und mittlere Aktivität
Frequenzabdeckungen - 1 Anzeige pro 24 Stunden
Geo - AUSWEIS
OS - Android und iOS
CPM Satz – $1.06
Abschließende Ergebnisse und Bereiche für Verbesserungen
Während der gesamten 6 Tage, in denen die Werbekampagne mit dem eCommerce-Angebot von Shopee lief, wurden die folgenden Kennzahlen erreicht:

Umrechnungen insgesamt – 3 578
Gesamtkosten (Einnahmen) – $1 770,56
Gesamtertrag (Gewinn) – $4 565,7
ROI (Rentabilität der Investition) – 157,87%
ROI ist einer der wichtigsten Indikatoren im digitalen Marketing, mit dem Sie die Rentabilität einer Werbekampagne beurteilen können. Einfach ausgedrückt, zeigt ROI den Prozentsatz der Werbeinvestitionen an, den Sie durch die Einnahmen aus den Anzeigen zurückgewinnen konnten.
Die Formel zur Berechnung von ROI lautet:
ROI = (Gesamtertrag - Gesamtkosten) / Gesamtkosten * 100%
Je höher dieser Wert ist, desto erfolgreicher ist eine Werbekampagne.
Durch die 6-tägige Einführung des eCommerce-Angebots von Shopee in Indonesien haben wir die Investition in die Werbekampagne vollständig wieder hereingeholt und einen zusätzlichen +$2 verdient 795,14 oben.
Empfehlungen:
Um gute Ergebnisse zu erzielen, empfehlen wir Ihnen, wie folgt vorzugehen:
Verwenden Sie die richtige Sprache
Erstellen Sie Landing- und Pre-Landing-Seiten in der Sprache des Ziellandes (in unserem Fall in indonesischer Sprache);
Sonderverkäufe anbieten
Prüfen Sie, ob es Sonderverkäufe gibt und fügen Sie diese in Ihre Pre-Landing- und Landing-Pages ein. Bitte erwähnen Sie keine nicht existierenden Angebote;
Legen Sie den Optimierungszeitraum fest
Denken Sie daran, dass Sie die ersten bestätigten Konversionen erst 3-5 Tage nach dem Start der Kampagne erhalten werden. Richten Sie also einen Optimierungszeitraum von mindestens 96 Stunden ein.
Wenn Sie diese Schritte befolgen und Ihre Kampagne optimieren, können Sie hohe ROI erzielen und die Rentabilität Ihrer Werbeaktivitäten steigern. HilltopAds bietet eine Vielzahl von Tools und Optionen, um erfolgreich eine eCommerce-Kampagne starten.
Möchten Sie eCommerce-Angebote betreiben und hohe Gewinne erzielen? Registrieren Sie sich bei HilltopAds!


