


Getting traffic is easy. Understanding which clicks actually make money is the hard part. If you’re running VPN CPI offers, the difference often comes down to tracking, attribution, and optimization–not the offer itself. This guide shows how to put those pieces together from day one.

What is CIPIAI and What Makes It Worth Testing
CIPIAI is a tech-focused CPA affiliate network that launched in 2024. The founding team came from affiliate marketing, which explains why the platform is built the way it is: direct and in-house offers and a clean easy to use tracking system.
VPN, antivirus, utilities, and mobile apps are CIPIAI’s core verticals – but not the only ones. CIPIAI isn’t limited to tech: sweepstakes and finance offers run on the platform too. What actually sets CIPIAI apart is the tech-driven, performance-first methodology behind how campaigns get built and scaled: clean funnels, transparent attribution, structured GEO targeting – the part that matters most for affiliates working pop traffic who want clean flows.
Need quality popunder traffic for these offers?
Register as an advertiser at HilltopAds.
New partners start with Net30 payouts, but you can get faster terms based on your performance. Ask your account manager which payout tier you qualify for. The minimum payout is $50 for PayPal and WebMoney, and $500 for wire transfers. Supported payment methods are PayPal, Wire, WebMoney, Wise, and Payoneer.
The support issue should definitely be highlighted since we have actually seen it. At CIPIAI every affiliate gets a personal manager. Telegram is fast enough for replies. Usually the flows are reviewed in about an hour but sometimes much quicker.
HilltopAds: The Traffic Source Behind This Guide
At HilltopAds, we focus on building the best ad network that works directly with publisher inventory. We do not resell traffic. With HilltopAds, you can access strong high-quality traffic volumes, especially on iOS in major markets. We support CPI campaigns by offering zone-level transparency and accurate data. Our platform also provides high-performance ad serving and innovative auto- and AI-based optimization tools.
HilltopAds and CIPIAI are a perfect match for VPN campaigns. CIPIAI passes both the zone_id and click_id for each click, ensuring you have accurate data for every optimization step.
This article will guide you through the entire process, from signing up with CIPIAI to receiving your first campaign results.
Promo code: Register on HilltopAds and enter promo code CIPIAI20 when making your first deposit of $200 or more to get +20% added to it.
Which CIPIAI Offer to Start With on HilltopAds
For Pop/Popunder traffic on HilltopAds, the offer to look at first is New VPN.
It’s an iOS CPI offer with prelander rotation built in, which removes the need to build your own landing page before testing. The conversion flow is straightforward: user sees the prelander, clicks through to the App Store, installs. No registration, no deposit, no qualification event to wait for.
| GEO | Payout | Model |
| US | $4.32 | CPI |
| GB | $3.60 | CPI |
| CA | $3.24 | CPI |
| JP | $2.88 | CPI |
| AU | $2.16 | CPI |
| DE, ES, IT | $1.44 | CPI |
| BR, MX, TW | $1.08 | CPI |
Technical requirements
Platform: Mobile only
OS: iOS 15+
Language restriction: no Vietnamese language targeting on TW and JP
Traffic types accepted: Pop/Popunder, In-App, Display, Push, Native, and others
Cap: This offer runs with a cap. Contact your CIPIAI manager before scaling to confirm current limits.
HilltopAds and CIPIAI have already run early tests on this offer using Pop/Popunder traffic on AU. Early results already look promising. We’ll update this guide with more detailed, HilltopAds-specific numbers as the campaign matures.
GEOs: Australia and Canada can be considered as a starting point. The reason is that you can outbid others much easier there as against in the US and still get decent payouts ($2. 16, $3. 24) with enough iPad and iPhone users there to get good iOS data fairly quickly.

Register with HilltopAds and get:
- Advanced targeting options
- Direct traffic sources
- Self-serve platform
- Fully-managed service
- Postback tracking
Step 1: Register on CIPIAI
Go to hi.cipiai.com and register with the CIPIAI affiliate network. It’s as easy as 1-2-3, and nobody is waiting for manual review queues. Choosing the option of registering via Telegram besides email makes you contact your personal affiliate manager right away – this is helpful, mostly for those of you who want flow URLs approved during the day you have submitted them. As soon as you have completed registration, a personal affiliate manager will be linked to your account.
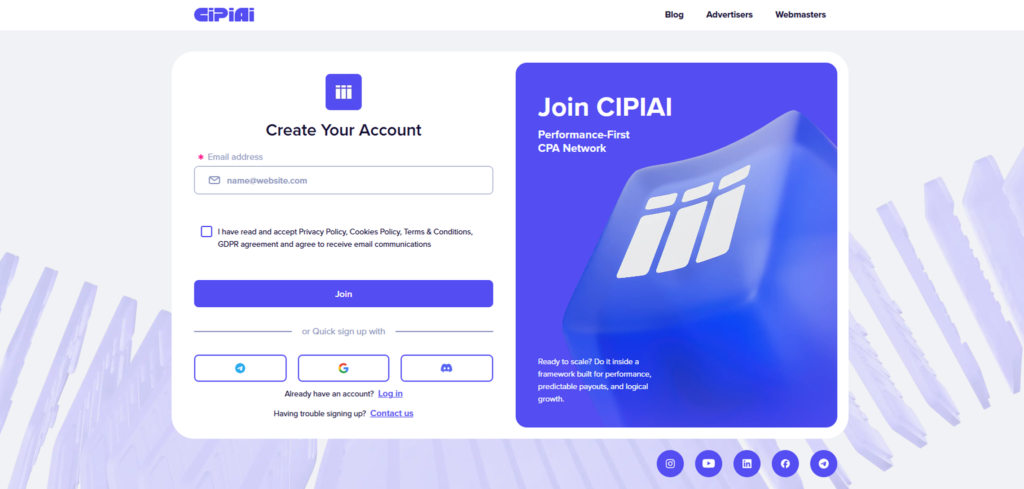
Promo code: Register at CIPIAI with promo code HILLTOP to get +15% on your first payout.
Check out our affiliate marketing events calendar for 2026–2027:

Step 2: Get Your Offer Flow URL from CIPIAI
Before building a campaign in HilltopAds, you need the tracking link from CIPIAI. The path below follows CIPIAI’s own onboarding flow: pick the offer, set a traffic source, name the flow and attach a postback, then wait for approval.
Walking Through It: New VPN as the Example
To keep this concrete, we’ll walk the whole path using New VPN offer – the offer covered earlier in this guide.
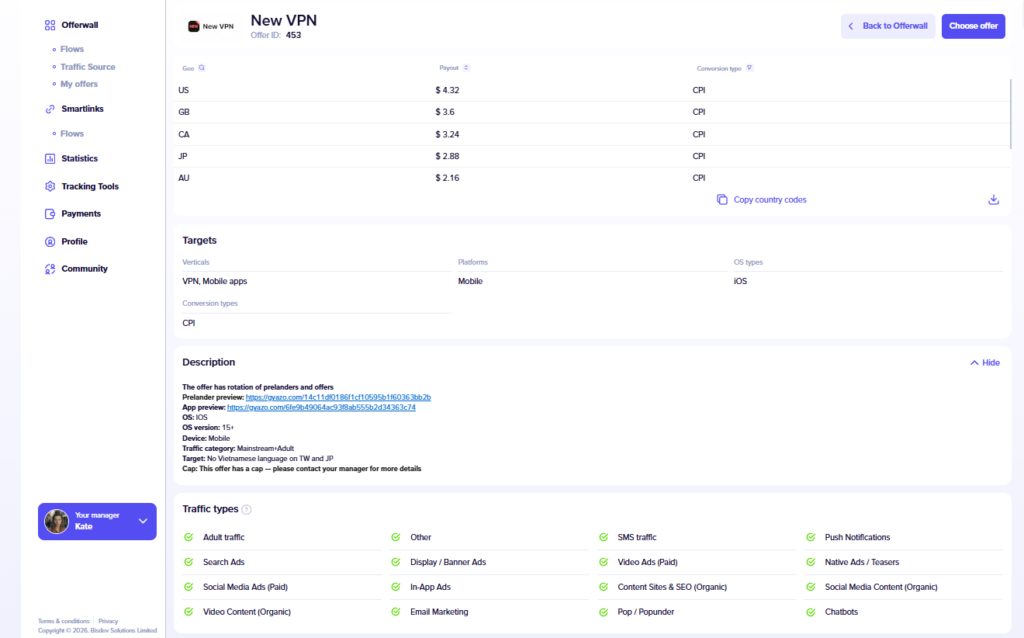
On the offer detail page inside the Offerwall, check three things that directly affect whether you get paid:
- Hard KPIs – e.g. an install2sub threshold (minimum % of installs expected to convert to a paid plan) and a sub2refund cap (maximum acceptable refund rate). Missing either can get a flow throttled or paused.
- Restrictions – commonly disallowed promotion methods such as the word “free,” celebrity imagery, or motivated/incent traffic. Read this before building creatives.
- Hold timing – conversions recorded during the current month are typically held until the first days of the following month, separate from the payout terms above.
Set Your Traffic Source
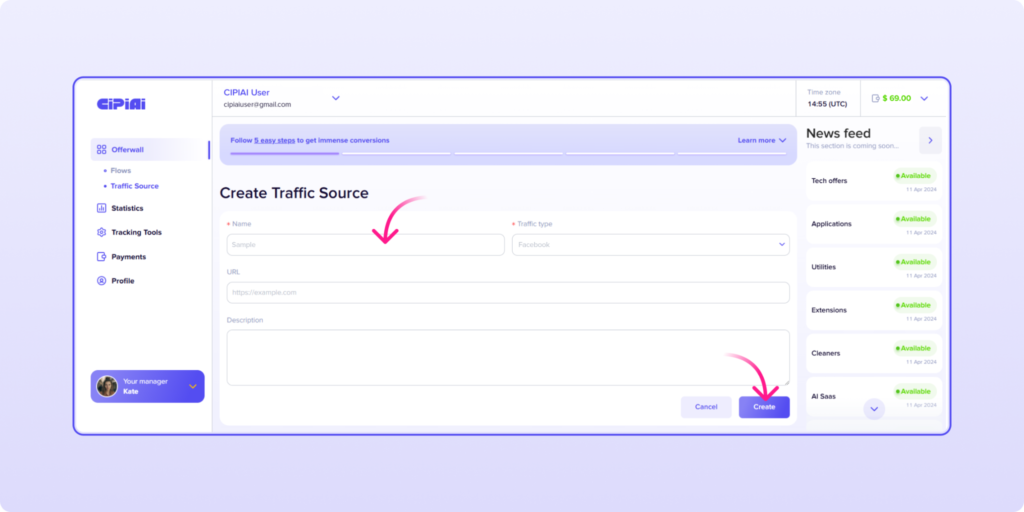
Once you’ve picked the offer, CIPIAI has you set a Traffic Source before you can continue – this step applies no matter which offer you’re applying to. Go to Offerwall → Traffic Sources → Create Traffic Source, name it (e.g. HilltopAds), and select the traffic type. You’ll pick this traffic source when you apply for the flow, and it’s what lets you filter your CIPIAI stats by source later – skip it and you’ll be blocked at the offer application step.
Name the Flow and Add a Postback
Apply for the flow, select the traffic source you just created, and give the flow a name (e.g. CIPIAI_NewVPN_HilltopAds). Attach the postback URL from Tracking Tools while you’re at it – see Step 3 below if you haven’t set that up yet; you can also add it to the flow later. Submit for moderation.
Wait for Approval, Then Grab the Flow URL
Approval usually takes about 60 minutes but could be even much sooner. When the approval has been granted, you can copy the flow URL directly from the offer page. You don’t need to ask your manager to send you a separate one!
The flow URL format looks like this: https://[your-tracking-domain]/f/[flow-id]?click_id={clickid}
The click_id parameter is what connects the impression in HilltopAds to the conversion in CIPIAI. Without it passing correctly, you’re flying blind on optimization.
Trafficback URL
When you request the flow from your CIPIAI manager, also ask for the trafficback link.
Trafficback is a redirect to catch viewers that didn’t convert by landing on the primary offer because of wrong OS, unsupported GEO, or other reasons like just not installing. Rather than letting the user just drop and lose the opportunity, the user will be sent to a secondary monetization source. With pop traffic where a notable portion of impressions will still miss their targets, setting up the trafficback at the very start means recovering the budget that was just going to be wasted.
Set the trafficback URL in your campaign settings or tracker before the campaign goes live. Retrofitting it after launch means you’ve already paid for that unconverted traffic once with nothing to show for it.
A trafficback URL example, built with the tokens CIPIAI exposes in the ‘Add new trafficback’ form: https://yourtracker.com/trafficback?click_id={{click_id}}&zone_id={{zone_id}}&subid_1={{subid_1}}
| Token | What it passes |
| {{click_id}} | Unique click identifier, needed to link the action (conversion) to a specific traffic source. |
| {{zone_id}} | ID of the ad zone or placement where the creative runs. Used to break traffic down by zone for analytics. |
| {{subzone_id}} | More granular sub-zone/block identifiers within a zone. Useful for finer segmentation when several elements (e.g., multiple banners) sit in one zone. |
| {{fb_id}} | Facebook campaign, ad set, or ad ID. Used when working Facebook/Meta traffic to track performance of specific campaigns. |
| {{tiktok_id}} | Equivalent parameter for TikTok Ads. Tracks conversion sources and creative/campaign performance from TikTok. |
| {{subid_1}} – {{subid_5}} | Custom parameters a webmaster can use to pass extra tracking info – traffic source, campaign, segment, etc. |
Register with the best ad network for advertisers HilltopAds
Step 3: Set Up Tracking and Postback
This is the step where most test campaigns break down, so it’s worth spending time on.
Direct setup (no external tracker)
If you’re running HilltopAds directly to the CIPIAI flow URL without a third-party tracker, the postback configuration happens inside CIPIAI.
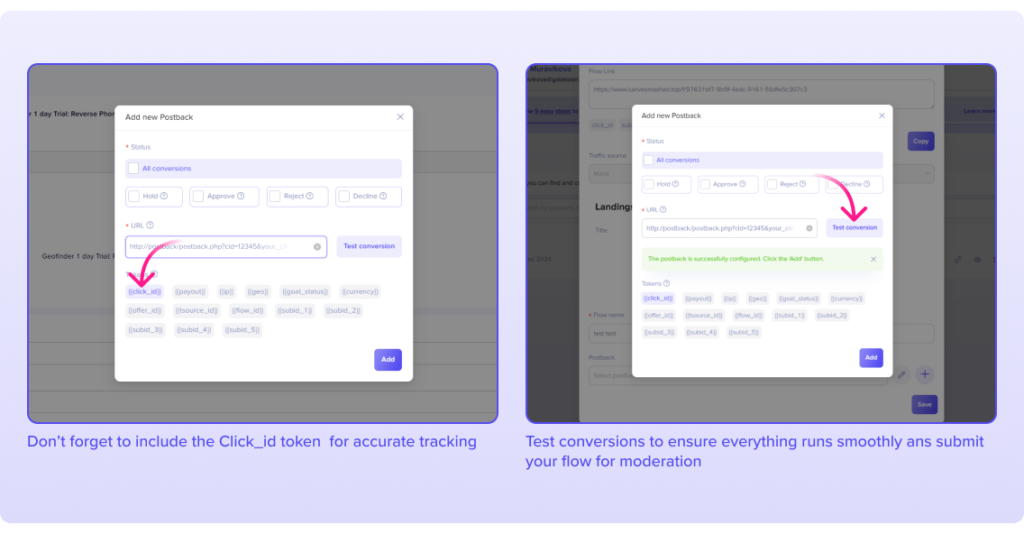
Go to Tracking Tools in the left menu of your CIPIAI dashboard. In the ‘Add new postback’ form, choose which conversion statuses should trigger it (All conversions, or any combination of Hold / Approve / Reject / Decline), paste your postback URL, and use the token list to build it.
| Macro | What it passes |
| {{click_id}} | Unique click identifier – links the conversion to the traffic source |
| {{payout}} | Conversion payout amount |
| {{goal_status}} | Conversion status (Hold / Approve / Reject / Decline) |
| {{geo}} | User’s country |
| {{ip}} | User IP |
| {{offer_id}} | Offer ID that triggered the conversion |
| {{currency}} | Payout currency |
| {{tsource_id}} | Traffic source ID |
| {{flow_id}} | ID of the flow (tracking link) the conversion came through |
| {{event}} | Name of the event/goal tied to the conversion |
| {{subid_1}} – {{subid_5}} | Custom parameters – creative ID, ad zone, segment, etc. |
A basic postback URL looks like: https://yourtracker.com/postback?click_id={{click_id}}&payout={{payout}}&status={{goal_status}}
Conversion statuses explained
- Hold – conversion received, pending verification
- Approve – verified and payable
- Reject – duplicate or fraud, won’t be paid
- Decline – rejected at advertiser discretion
For CPI campaigns, in most cases, you want to run on Approve only. It gets tricky when you’re turning on the Hold too; for example, the CPI system is such that a Hold postback is sent first and then separately, an Approach is triggered once the conversion has passed the verification stage.
If, for some reason, your tracker doesn’t deduplicate the conversions with click_id, for every real conversion, you’ll log two conversions and as a result, you would have inflated CR and EPC figures. If you wish to understand the rejection rate, add only Reject and Decline (compared to Hold, which poses a double-counting risk).
One setting worth knowing about in the postback form: ‘Send zero price conversions.’ Leave it enabled if you want Reject or Decline events – which carry no payout – to still fire a postback to your tracker. That’s what lets you see rejection rates instead of only approved revenue.
Testing the postback
A test facility is integrated in CIPIAI. Use the ‘Test conversion’ button located in the Tracking Tools category to send a dummy conversion. In most cases, a 400 response is because the tracker part is asking for a genuine click ID within the click ID placeholder, so it is entirely normal. How to fix this? Create a short-term test campaign from your tracker to anywhere (a Google search page would be perfect). Open the tracking link to get a generated real click ID, then replace the placeholder {{click_id}} in your postback URL with that ID, and send a Test conversion button once more.
While performing this action, do not rely solely on the confirmation popup from CIPIAI; also check the conversion log of your tracker. Yes, some trackers raise an error toast like 500 in the CIPIAI dashboard for a test run that actually landed successfully on the tracker side. That means, do not take the popup as an indication of the outcome but only as a suggestion; the tracker log is the ultimate proof. Having done so, return {{click_id}} to what it was only then launching live.
Always use HTTPS in your postback URL.
Setup with an external tracker (BeMob, Skro, MaxConv)
If you’re routing traffic through a tracker, the chain looks like this: HilltopAds → Tracker → CIPIAI flow URL → App Store → Conversion → Postback → Tracker → HilltopAds
- BeMob: Go to Offers, click + New, select CIPIAI as the affiliate network, and paste the flow URL. BeMob appends the click ID parameter automatically.
- Skro: Go to Offers, click + Create. Skro doesn’t auto-append the click ID, so add it manually at the end of the flow URL: ?click_id={clickId}. Select CIPIAI as the network, save.
- MaxConv: Go to Offers, click + Create. Select CIPIAI as the affiliate network, paste the flow URL. MaxConv appends click_id={mc_click_id} automatically.
In all three cases, CIPIAI needs to be added as an affiliate network inside the tracker first. Your personal manager can provide the postback URL format that works with each tracker’s setup.
We recommend reading our article on 10 affiliate marketing myths:

Step 4: Create Your Campaign in HilltopAds
With the flow URL ready and postback configured, you can build the campaign.
Recommended initial settings
Ad format: Popunder (Onclick)
Pricing model: CPM
Traffic channel: High Activity
Campaign name: use something descriptive – e.g. CIPIAI_NewVPN_AU_Popunder_iOS_Mobile
Frequency cap: Start at 1/24. For some Eastern GEOs, 2–4/24 may perform better, but test at 1 first.
Targeting
GEO: One per campaign. Don’t mix AU and CA in the same campaign – you can’t optimize them against each other if they’re bundled.
Device: Mobile only (this offer doesn’t run on Desktop)
OS: iOS, version 15+
Language: Match the GEO. If you decide to run campaigns on TW and JP, exclude Vietnamese – it’s a stated offer requirement.
Budget
Daily budgets depend on the GEO. AU and CA have lower CPM than US, so your testing budget goes further. A starting daily cap of $50–75 gives you enough data to see whether a zone is converting without burning through the budget on a misconfigured postback. Once the flow is confirmed to track correctly, increase the daily cap.
Enable Auto-Optimization once you’ve collected enough conversion data. HilltopAds’ auto-optimization tool automatically blacklists zones that don’t meet your target metrics, which removes the manual blacklist grind from the early testing phase.
Disclaimer: As with any form of digital marketing, no results can be guaranteed, and performance will depend on the GEO, targeting, creatives, and optimisation approach.
The example used in this guide of the New VPN offer is solely for the purpose of showing how to set up a campaign. You should refer to the full list of CIPIAI offers since the available options might differ. HilltopAds works perfectly with the following verticals: VPN, Dating, Games, Mobile Apps, iGaming, Pin-Submits, eCommerce, Sweepstakes, OnlyFans, etc.
Please also note that HilltopAds does not allow the use of aggressive landing pages (for example, misleading claims, fake system alerts or warnings, fake interfaces, or other deceptive features). Landing pages of this kind may result in campaigns being rejected during the moderation process.
In a more general sense, compliance requirements extend beyond landing pages, and therefore we advise that you check our full terms and policies before launching any campaign. It should be noted that your approval status may change over time – an offer or piece of creative that was approved yesterday might not be approved today. If your campaign is rejected, refer to our current rules rather than assume that it is an error. For more information, see the Full Guide About Prohibited Ads
Add your website and earn today as never before this!
Traffic from all over the world with payouts every Tuesday
Step 5: Analyze Performance and Decide What to Do Next
HilltopAds dashboard
- Impressions
- Spend
- CPM by zone
- Ad zone IDs (for blacklisting underperformers – pass zone_id in your flow/trafficback URL so CIPIAI-side conversions map back to the same zones)
CIPIAI dashboard
- Clicks
- Installs (conversions)
- CR%
- EPC
- Revenue
- Conversion status breakdown (Approve vs. Hold vs. Reject)
One thing to keep in mind before you jump to conclusions because of a figure difference: CIPIAI’s “Clicks” indicator may be quite a bit lower than the “delivered” numbers reported by HilltopAds. That difference is a click loss – redirects that never complete due to popup blockers, lost connections, or sluggish devices – and not a tracking mistake. If you want to be sure that all the clicks have been recorded properly at the zone level, you should compare the count of clicks from the CIPIAI with that from the tracker but definitely not against the number of the impressions coming from HilltopAds.
What to watch for on a CPI VPN offer
CR on Pop traffic for mobile VPN CPI tends to sit in the 0.01–0.03% range on cold traffic during the testing phase. That’s not a sign something is broken; it’s the nature of popunder on iOS. You’re paying for impressions, not clicks, so the metric that matters most in the first 48 hours is whether conversions are firing at all and whether the click_id is passing correctly to CIPIAI.
Once you have 20–30 installs from a zone, you have enough to make a call. Zones consistently above your target EPC keep running; zones that burn through CPM without conversions get paused.
Don’t touch frequency until you’ve seen at least 3 days of data. A zone that looks dead on day one sometimes stabilizes by day three once the algorithm finds the right audience segment.
Get inspired by our advertisers’ success stories of running VPN offers with HilltopAds:

Final Thoughts
The reason this pairing is worth testing isn’t the payout table – plenty of tech-vertical networks match CIPIAI on price. It’s that CIPIAI exposes zone-level tracking (zone_id, subzone_id, fb_id, tiktok_id) all the way through trafficback, not just on the primary conversion. Most networks in this space stop at click_id and call it done. That’s the difference between guessing which zones to blacklist and actually knowing.
Results on any single GEO/offer combination will vary with creatives, targeting, and traffic quality – treat the AU test numbers in this guide as a starting reference, not a guarantee. Lean on your CIPIAI manager for current caps and KPI thresholds before scaling spend.