


An affiliate campaign can fail before the first click even arrives – simply because tracking, postbacks, or traffic routing were set up incorrectly. Follow a real mVAS setup from scratch and see how HilltopAds, Binom, and Golden Goose connect into one working campaign.

Launching an affiliate campaign involves more than simply choosing an offer and buying traffic. You need to connect the offer, tracking infrastructure, and traffic source correctly – and make sure the entire setup works before the first click comes in.
That’s exactly what we’re going to do in this guide.
Together with the Binom team, we’ve put together a practical, start-to-finish walkthrough of an mVAS campaign setup. The technical setup and testing were carried out by Binom, while HilltopAds serves as the traffic source. For the offer side, we’re using an mVAS offer from Golden Goose.
Ready to take your mVAS campaign to the next level?
Join HilltopAds and tap into traffic from 250+ GEOs.
Our setup looks like this:
Traffic source: HilltopAds
Tracker: Binom
Affiliate network: Golden Goose
Vertical: mVAS
We chose mVAS because it has a relatively simple conversion flow, making it a perfect example for understanding the mechanics behind an affiliate campaign.
We’ll follow the entire process from scratch: install and activate Binom, configure the tracker, add the Golden Goose offer, connect HilltopAds, set up tracking, and prepare the campaign for launch.
On the HilltopAds side, Jake Elm, HilltopAds Advertiser Manager, monitored the experiment. With hands-on experience working with advertiser campaigns, Jake helped oversee the traffic setup and provided his expertise throughout the test.
If you’re new to affiliate marketing or have never built the entire setup yourself before, this guide will help you see not only what to configure, but how the traffic, tracking, and offer sides work together.
Read our article on how to create a High-Converting Landing Page:
1. Setting up Binom
Every click we buy through HilltopAds needs to be tracked properly before it reaches the offer. That makes the tracker the logical place to start.
For this setup, we’re using Binom. Before connecting our Golden Goose offer and sending HilltopAds traffic, we first need to install the tracker on a server and activate it.
Before Installing Binom
The Binom team recommends installing the tracker on a clean server with no other active projects running on it. This helps reduce the risk of software conflicts. Binom provides detailed installation instructions in its documentation, and its support team can assist if you encounter technical issues. Here, we’ll follow the installation process used for this particular setup.
Step 1. Connect to the Server
Connect to the server where you’ll install Binom.
PuTTY is one of the standard terminals that can be used for this purpose. In our example, the Binom team uses a different terminal application, but this doesn’t affect the installation process itself.
Once the connection is established, we’re ready to install the tracker
Step 2. Download and run the installer
Copy the Binom installer link and use it to download the installation script to your server.
Then, launch the installer from the terminal. Before installation begins, the script automatically checks whether the server meets the necessary requirements.
If the check is successful, you’ll be asked to provide an email address. Enter your email, press Enter, and the installation will begin.
Step 3. Complete the installation
In our test, installation took approximately 15 minutes. Once the process was complete, the terminal confirmed that Binom had been successfully installed and provided the information required to access the tracker:
- Default tracker URL
- Login
- Password
- Tracker ID
Save these details, as you’ll need them to access and activate the tracker.
Step 4. Activate the tracker
The Tracker ID is the unique identifier assigned to your particular Binom installation.
Copy it and add it to the corresponding license in your Binom account. This links the installed tracker to your license, so you can log in and start using it.
With the tracking infrastructure ready, we can move on to the offer.
2. Adding the Golden Goose affiliate network and offer
Before we proceed, open your Binom account and go to the ‘Affiliate network’ tab, then add a new one. You can either fill in information about the network manually or go to the catalog and choose from the list of available affiliate networks.
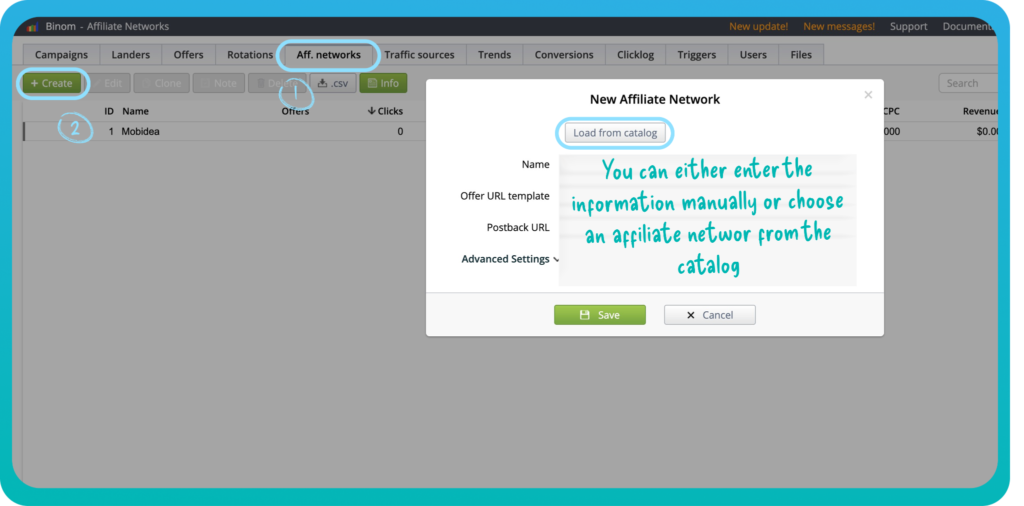
Golden Goose is already on the list, so we just select them and save the changes.
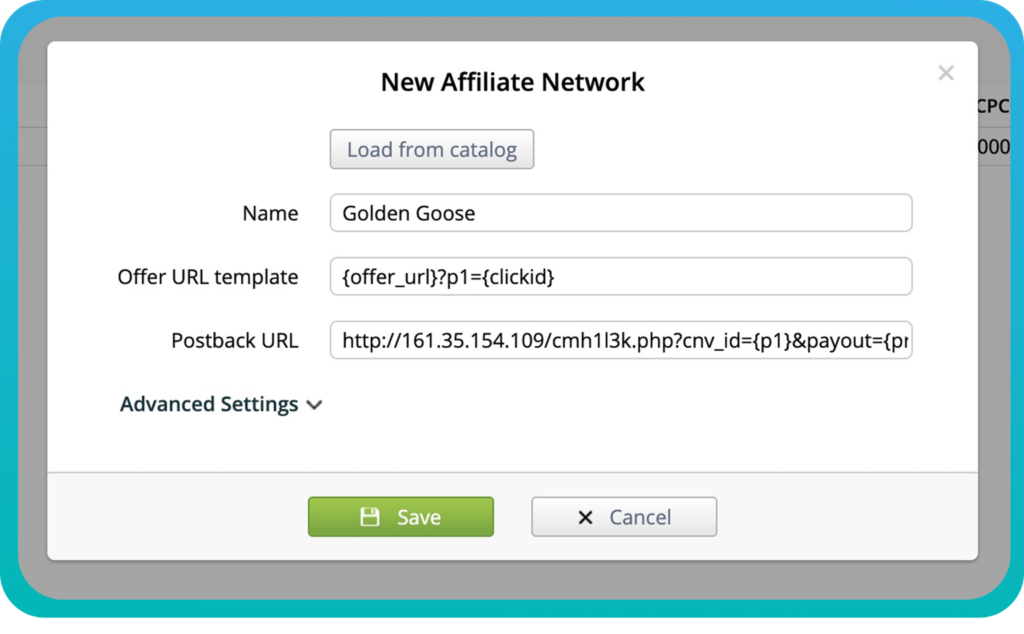
The next step is to select the offer in Golden Goose and add it to Binom.
We’ll start on the affiliate network side.

Step 1. Get the offer link in Golden Goose
Log in to your Golden Goose account and find the offer you want to promote. You can browse the Offer Wall or search for a specific offer if you already know its ID.
Open the selected offer and click View Details → Get Link.
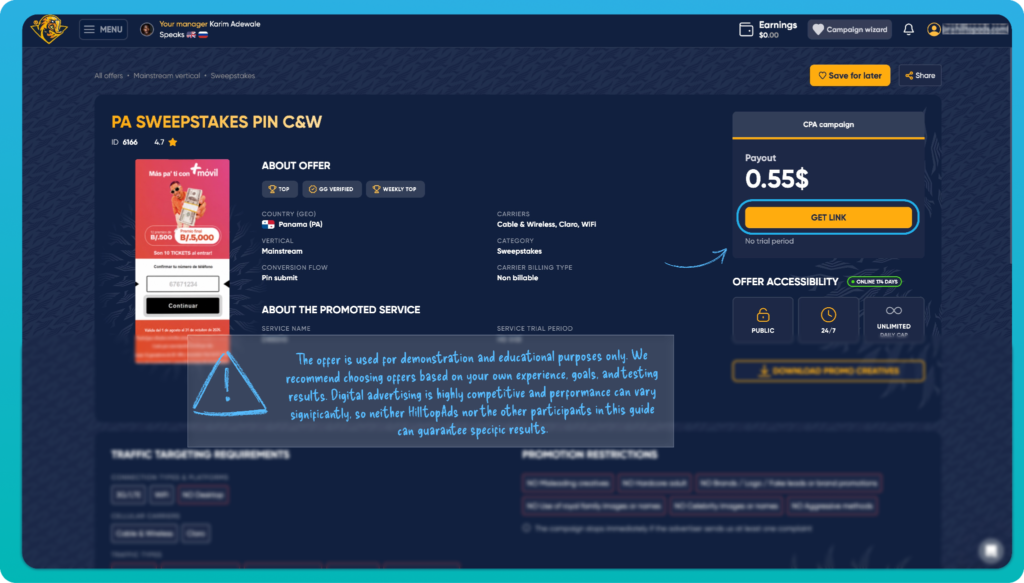
Golden Goose will create the campaign on the affiliate network side and provide the offer URL. We will need this URL for configuring the offer in Binom.
Copy it and go back to the tracker.
Note: The offer and campaign settings featured in this guide are used for demonstration and educational purposes only. We recommend choosing offers, targeting, and campaign settings based on your own experience, goals, and testing results. Digital advertising is highly competitive and performance can vary significantly, so neither HilltopAds nor the other participants in this guide can guarantee specific results.
Step 2. Create the offer in Binom
In Binom, open the Offers section and click Create.
Start by entering an offer name. For easier navigation later, it makes sense to use the same or a similar name to the one used in Golden Goose.
Paste the Golden Goose offer URL into the corresponding URL field.
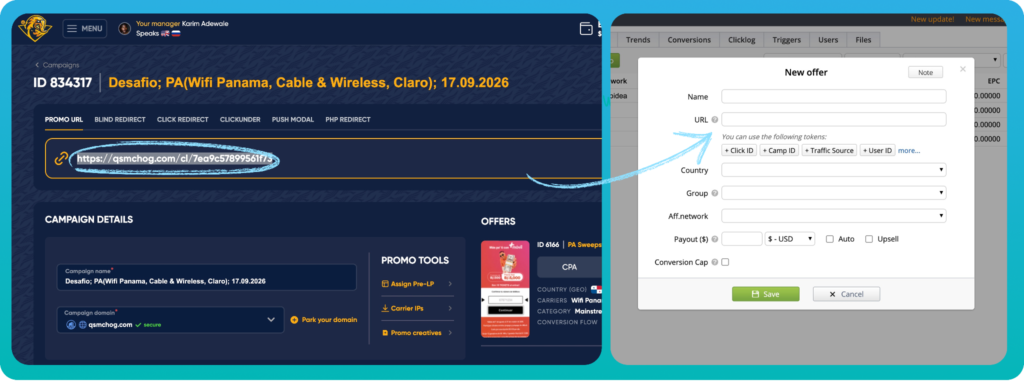
Next, associate the offer with the Golden Goose affiliate network in Binom.
Because the affiliate network has already been configured in our tracker, selecting it automatically applies the relevant parameters from the network template. It also provides the postback template we’ll use for conversion tracking.
Step 3. Configure the payout
While creating an offer, you can also configure some additional settings: Country, Group, Tax, and others. These are not obligatory for the basic setup we demonstrate here, but can help you organize your campaigns.
The setting we need to pay particular attention to is Payout.
With Auto enabled, Binom receives the payout value dynamically through the postback rather than assigning the same fixed payout to every conversion.
If Auto is disabled, you’ll need to specify a fixed payout value manually.
You’ll also see two additional options:
Upsell determines how repeated payouts associated with the same conversion are handled. When enabled, additional payouts can be added to the existing value instead of replacing it.
Cap lets you set limits for the offer, such as conversion or click limits. We won’t use it in this example.
Don’t forget to save the settings once they are done.
The Golden Goose offer is now available in Binom.
3. Setting up the postback
Now we need Golden Goose to notify Binom when a conversion occurs. For this purpose, we will use a postback URL.
The basic tracking flow looks like this:
HilltopAds sends traffic → Binom records the click → User reaches the Golden Goose offer → Conversion occurs → Golden Goose sends the conversion back to Binom → Binom notifies HilltopAds about the conversion
In Binom, copy the postback URL generated for the Golden Goose affiliate network.
Then return to the relevant campaign settings in Golden Goose and find the postback settings. Paste the Binom postback URL into the corresponding field and save it.
A basic postback contains your tracker domain, an endpoint, and the parameters required to identify and record the conversion.
Among the key values in our setup are:
- Conversion ID – identifies the click/conversion that should be updated in the tracker;
- Payout/Profit – passes the conversion value back to Binom.
When Golden Goose reports a conversion, the postback URL placeholders are automatically replaced with the actual values.
Once the postback has been saved, the affiliate network and tracker can exchange conversion data.
Read our article about alternatives to RichAds:

4. Adding a landing page to Binom
Before creating the final campaign flow, we’ll also add a landing page.
In affiliate marketing, this is often referred to as a pre-landing page: an intermediate page shown before the user reaches the final offer.
For this experiment, we’ll use it as part of our traffic-routing logic later in the guide.
Open Landers in Binom and click Create.
Give the landing page a descriptive name.
Binom allows you to work with either an external landing page URL or a landing page integrated directly into the tracker. For this setup, we’re using the integrated No Redirect option.
Choose Upload New Landing, select the prepared landing page file, upload it, and click Save.
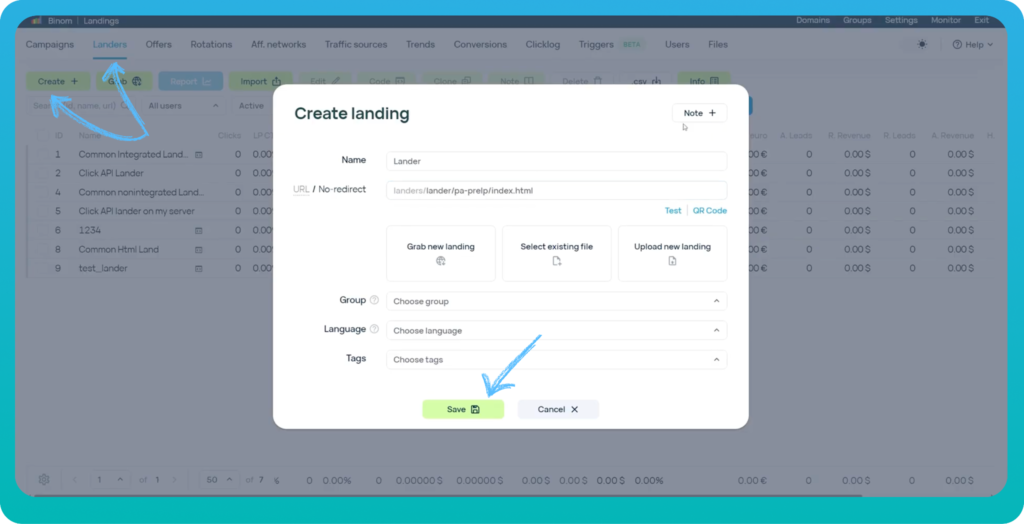
The landing page is now available and can be added to our campaign paths.

Register with HilltopAds and get:
- Advanced targeting options
- Direct traffic sources
- Self-serve platform
- Fully-managed service
- Postback tracking
5. Creating the campaign in Binom
Now that the offer and landing page are available, we can create the actual tracking campaign.
Go to Campaigns → Create in Binom.
Step 1. Add the basic campaign settings
Start by giving the campaign a descriptive name.
Binom also allows you to organize campaigns using groups and tags. These aren’t required for our setup, but they can become useful when you’re managing multiple campaigns.
Next, select HilltopAds as the traffic source.
This is an important step because the traffic source template determines which HilltopAds parameters and tokens will be included in the campaign URL.
Step 2. Configure cost tracking
Next, configure the Cost Type.
Binom supports several cost models, including CPC, CPM, and CPA. It can also receive cost information dynamically when Auto cost tracking is enabled.
For this campaign, we’ll use automatic cost tracking rather than entering a fixed value manually.
This distinction will become important later: our HilltopAds campaign will buy traffic on a CPM basis, while Binom can receive the calculated cost associated with individual clicks through the parameters passed in the campaign URL.
In other words, the buying model and the way the tracker records click-level cost data don’t necessarily need to look identical.
Finally, select the campaign domain.
That completes the basic campaign settings. Now we can configure what happens to each click after it reaches Binom.
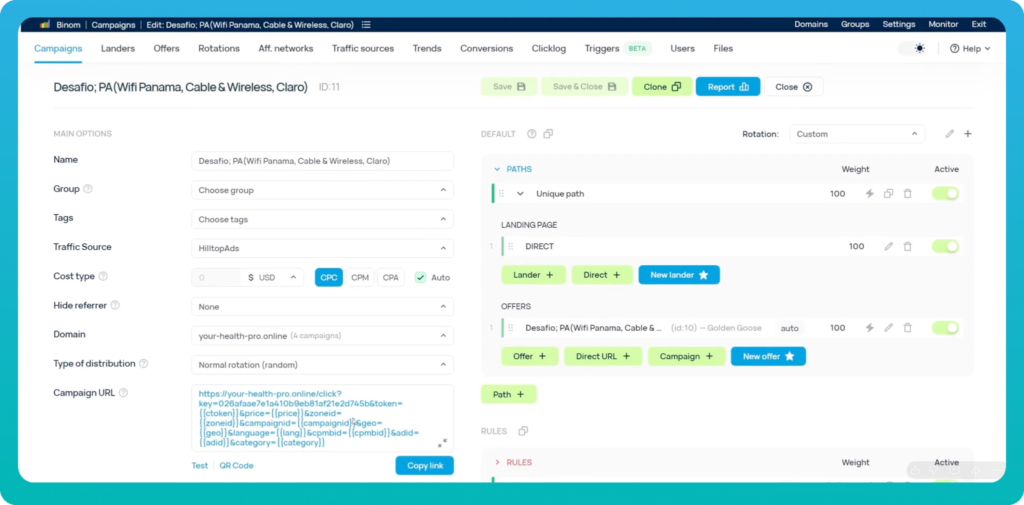
Step 3. Build the campaign paths
The right side of the campaign interface controls the traffic flow: where a click goes first, which conditions are checked, and which landing page or offer is eventually displayed.
For this experiment, we’ll create two paths.
The first will be a Direct path leading straight to the Golden Goose offer. Enabling Direct tells Binom to skip the landing-page stage and send the click directly to the offer.
We’ll use this path for unique clicks.
Next, we’ll create another path for non-unique clicks.
Add a uniqueness rule so that clicks that have already appeared in the campaign can be routed differently. In our experiment, these non-unique clicks will first see the landing page we uploaded earlier and will then proceed to the same Golden Goose offer.
The resulting logic looks like this:
Unique click → Offer
Non-unique click → Pre-landing page → Offer
This gives us an opportunity to observe whether introducing an additional pre-landing stage changes the behavior of returning traffic.
Note: This routing logic is part of our particular experiment, not a universal setup for every mVAS campaign. Your funnel and routing rules should reflect the offer, traffic, and testing objectives you’re working with.
Click Save when the paths and rules are ready.
Binom will then generate the campaign URL.
Because HilltopAds has been selected as the traffic source, the URL also contains the traffic-source tokens configured in the HilltopAds template. These allow relevant information to be passed from HilltopAds to Binom when a click occurs.
We’ll use this URL when creating the campaign in HilltopAds.
Step 4. Enable Binom protect for research
For this experiment, the Binom team also enabled Binom Protect to collect additional information about potentially automated traffic.
Initially, it was used in Research Mode. In this mode, clicks are analyzed and labeled for later analysis, but the results don’t affect traffic routing.
This allows us to collect data first and evaluate how clicks were classified after traffic has been running.
For the purpose of this experiment, we aren’t using bot-detection results to redirect or block traffic at this stage.
With that, our Binom campaign is ready.
We recommend that you study the successful cases of our advertisers:

6. Creating the campaign in HilltopAds
We now have everything required on the tracking side:
Golden Goose offer → Binom campaign → Campaign URL
The final stage is to create the advertising campaign in HilltopAds and start sending traffic to that URL.
Log in to your HilltopAds Advertiser account and go to Manage Campaigns → Add Campaign.
Register with the best ad network for advertisers HilltopAds
In our Help Center we have a detailed illustrated step-by-step guide on how to create campaigns.
Important: The settings below are the settings used for this particular test. They shouldn’t be treated as universal targeting or optimization recommendations. Suitable settings depend on the offer, GEO, audience, traffic type, and campaign objectives. If you’re unsure about a particular configuration, your HilltopAds manager can help you evaluate the available options.
Step 1. Set the ad format and pricing model
For our test, we select Popunder Mobile as the ad format.
Next, choose the pricing model. For this experiment, we’re using standard CPM.Next, configure the basic campaign settings.
For this test, we select the relevant traffic channel – starting with High Activity traffic is recommended for the best results and smoother campaign launches. Then, give the campaign a descriptive name.
In the Final Destination URL, paste the campaign URL generated by Binom.
The URL already contains the HilltopAds tokens configured through the traffic-source template. These placeholders allow information such as Zone ID, GEO, and other available parameters to be passed to the tracker.
HilltopAds also provides an Add Placeholders option where you can review the available placeholders.
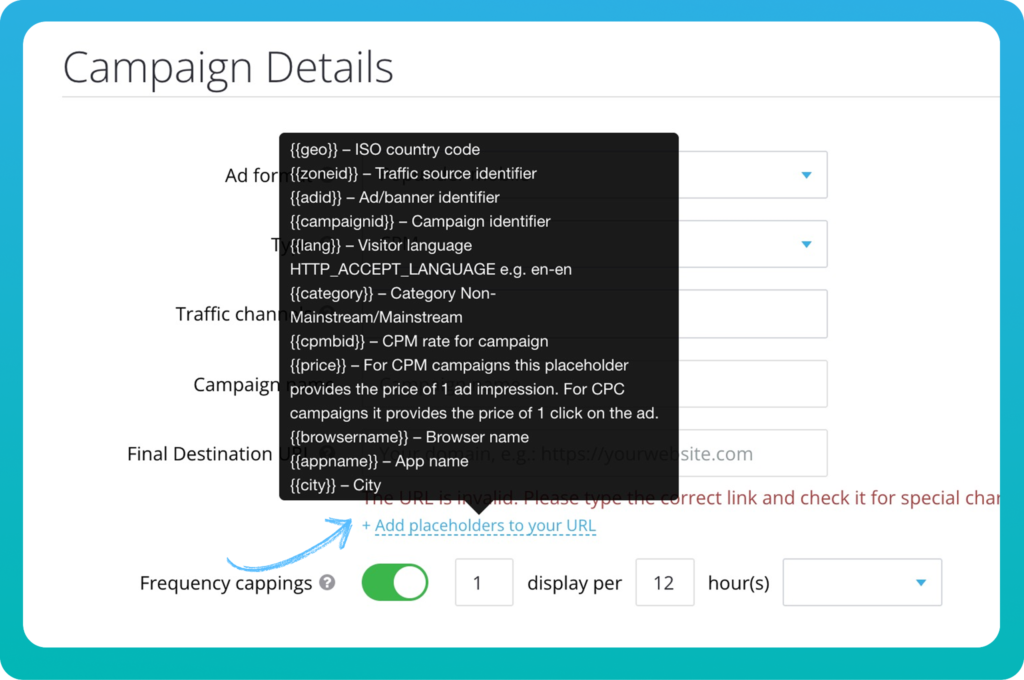
For frequency capping, we keep the default value in this particular test.
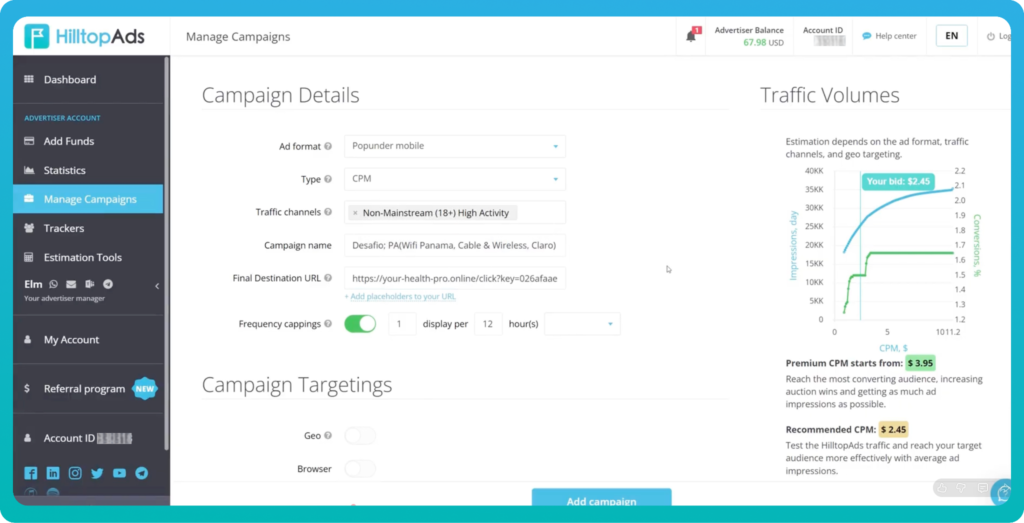
Step 2. Set up targeting
Now we can configure campaign targeting.
HilltopAds provides multiple targeting options, so the exact setup will depend on the offer you’re promoting.
‼️Before excluding or including a particular traffic segment, consider the requirements of your offer and the data available from your campaign.
In our test setup, we also use an auto-optimization rule as an example:
More than 50,000 impressions + fewer than 3 conversions → Blacklist Zone
Note: The values above belong to this specific experiment and shouldn’t be treated as recommended thresholds for every campaign.
The purpose of the rule is to demonstrate the logic: once enough data has accumulated, Automatic Optimization can take a predefined action when a traffic source meets the conditions you’ve set.
Step 3. Set the Budget, schedule (if needed), and the CPM bid
Campaign limits are an important safeguard, particularly when you’re testing a new setup. For this experiment, we set a $20 daily budget limit.
Finally, choose whether the campaign should start automatically after it passes moderation.
The final major setting is the bid.
In our example, we use a CPM bid of approximately $2.20.
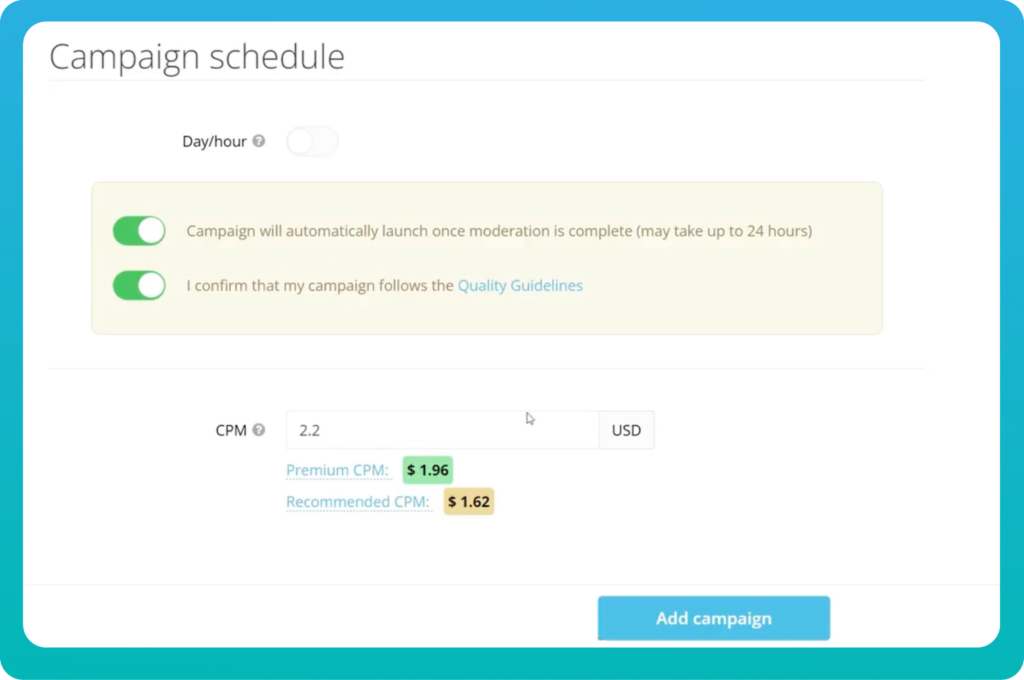
There’s an important distinction here between how you buy traffic in HilltopAds and how Binom records traffic costs.
The HilltopAds campaign uses CPM, meaning the bid is based on 1,000 impressions.
At the same time, the campaign URL contains a price token that can pass the calculated traffic cost to Binom. This allows the tracker to receive cost information associated with the incoming click even though the advertising campaign itself is purchased using CPM.
That’s why you may see CPM on the HilltopAds side while Binom records click-level cost information automatically.
Review the campaign settings and click Add Campaign.
The complete setup
At this point, all three platforms are connected:
HilltopAds → Binom → Golden Goose
HilltopAds sends the traffic. Binom records and routes each click according to the campaign logic. Golden Goose hosts the offer and reports conversions back to Binom through the postback.
In simplified form, the complete data flow looks like this:
Ad impression → HilltopAds click → Binom tracking and routing → Golden Goose offer → Conversion → Postback to Binom
This is why setting up tracking before launching paid traffic matters. Once the campaign starts, you’ll be able to analyze not only conversions, but also how different traffic segments and campaign paths perform.
The exact settings you use will naturally change from campaign to campaign.
The setup we’ve shown here is one practical example rather than a universal campaign template. Use it to understand how the individual components connect, then adapt the targeting, funnel, budget, bidding, and optimization rules to your own offer and traffic.
And once everything has been checked, approved, and tested, you’re ready to launch.
In Part 2, we’ll return to this campaign with real performance data, analyze the results, and see what can be optimized to improve its performance.
See you in Part 2!