


The bigger your campaign gets, the harder it becomes to spot zones that quietly waste your budget. This guide explains how to automate that process without sacrificing performance.

If you’re running campaigns across dozens (or hundreds) of zones, you already know the drill: some placements convert like magic, others just burn through budget with nothing to show for it. The problem isn’t spotting the bad zones, but finding the time to track them all every single day.
Auto Optimization is designed to solve this problem. You just set up your rules, and the system takes care of the rest. It checks your stats on a schedule and blocks or moves zones as needed.
Here’s how it works and how to set it up so it catches exactly what you want it to catch.

Join HilltopAds today and
unlock powerful auto-optimization tools to maximize your ROI.
The Basic Logic
Auto Optimization runs on a simple loop:
You set a rule in campaign settings → the system checks your stats on schedule → conditions are met → the action happens automatically.
You don’t have to manually dig through reports; there’s no need to remember to check in every few hours. Once the rule is live, it just runs in the background.
Each rule has three parts that you need to set up: Period, Action, and Conditions.
Period: How Far Back, and How Often
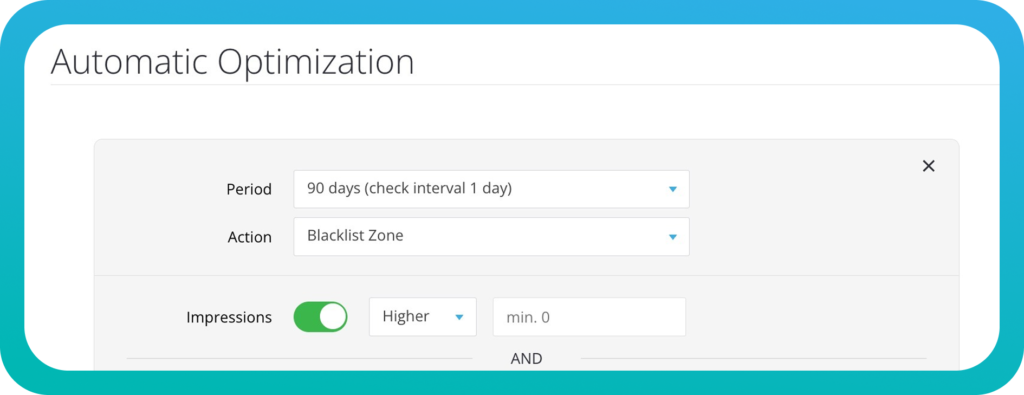
The ‘Period’ setting lets you control two things: how much data the system uses and how often it checks your zones.
Shorter periods (1–3 days) are checked every 30 minutes, which is great for quickly catching obviously junk or irrelevant traffic. Mid-range periods (5–14 days) check hourly. Longer windows (30–90 days) should be checked once a day (the best option when you’re evaluating zones on a longer, more patient timeline).
One important note: stats are always total over the entire period, not just whatever happened since the last check. A 90-day period always looks at the full 90 days of data, every time it runs.
Read our latest article on the best alternatives to the Onclicka ad network:

Watch Out for Conversion Lag
This issue is one of the most common (and most expensive) in rule-setting. Auto Optimization considers your conversion within the timeframe that you have defined and ignores the outside data entirely. Conversions which are made outside of that timeframe and are not detected would remain undetected by the system no matter how well the zones are performing.
So, to understand practically how it works: imagine a rule like “blacklist the zone if it doesn’t generate 2+ conversions within 2 days. ” You are counting deposits which are often the result of such a longer path: a user clicking on advertisement on the first day, registering on the second day, and finally making a deposit on the third day (and it could even be later). The postback for this conversion will be late as well as the first check (zone status) made by the system after the rule has already taken effect at the first conversion of a zone.
As a consequence, a zone is marked as “underperforming” even though the reality is that the conversion did take place just not in time as per your Period setting.
How to avoid it:
Check your tracker’s time-to-convert data
Most trackers show average conversion timing or a day-by-day breakdown of when conversions land relative to the click – this tells you what Period actually makes sense for your offer.
Choose Period that you have room enough on the conversion cycle of your main conversion
If deposits mostly come in on day 2 or day 3, 1, 2 day Period could easily result in a lot of your high converting campaigns being cut.
Match Period to the action you are optimizing around
Short Periods work fine with very fast actions (e. g. clicks installs registrations). Longer delayed actions (deposits purchases subscriptions) require a longer window, often 5, 14 days or more for such vertical depending.
Mix short and long Periods when accuracy is as much your priority as speed of rule
Multi-block rules let you quickly identify and reject junk traffic zones using one small block while a much slower zone rejection block allows you to also identify those delayed conversions and protect them from being cut.
The rule of thumb: the longer a user’s path to your target action, the longer your Period needs to be for the rule tracking it.
Register with the best ad network for advertisers HilltopAds
Action: What Happens When a Zone Fails
When a zone meets your rule, you have two options for what happens next:
Blacklist Zone
This is the simplest option. The zone stops receiving impressions in this campaign, full stop. If you’re running on a blacklist model, the zone gets added to it. If you’re running on a whitelist, the zone gets removed from it. Either way, the outcome is the same: no more impressions there.
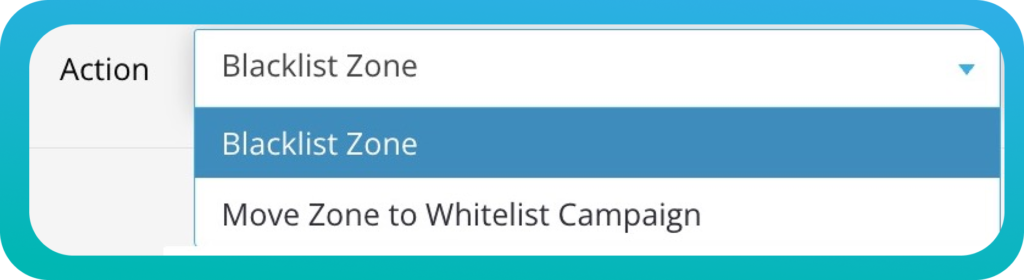
Move Zone to Whitelist Campaign
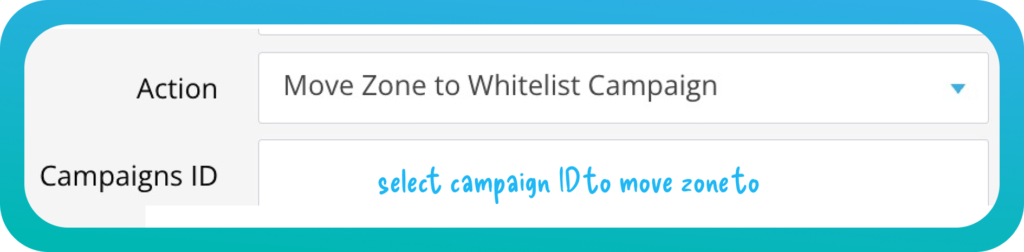
This approach might sound a bit more sophisticated but, in fact, it’s a pretty smart idea to test. The zone will be excluded from this campaign and moved to another whitelist campaign (you need to specify the campaign ID in the settings).
Still, please remember that target campaigns must belong to the same advertiser account and already be selected in the rule setup.
Conditions: What “Underperforming” Actually Means
This is where you set what counts as a failure. You can track:
- Impressions – total volume during the period
- Spend – total amount spent during the period
- Conversions – total conversions, any type
- Label Conversions – conversions matching a specific label (use none to catch conversions with no label at all)
- eCPA – spend divided by conversions
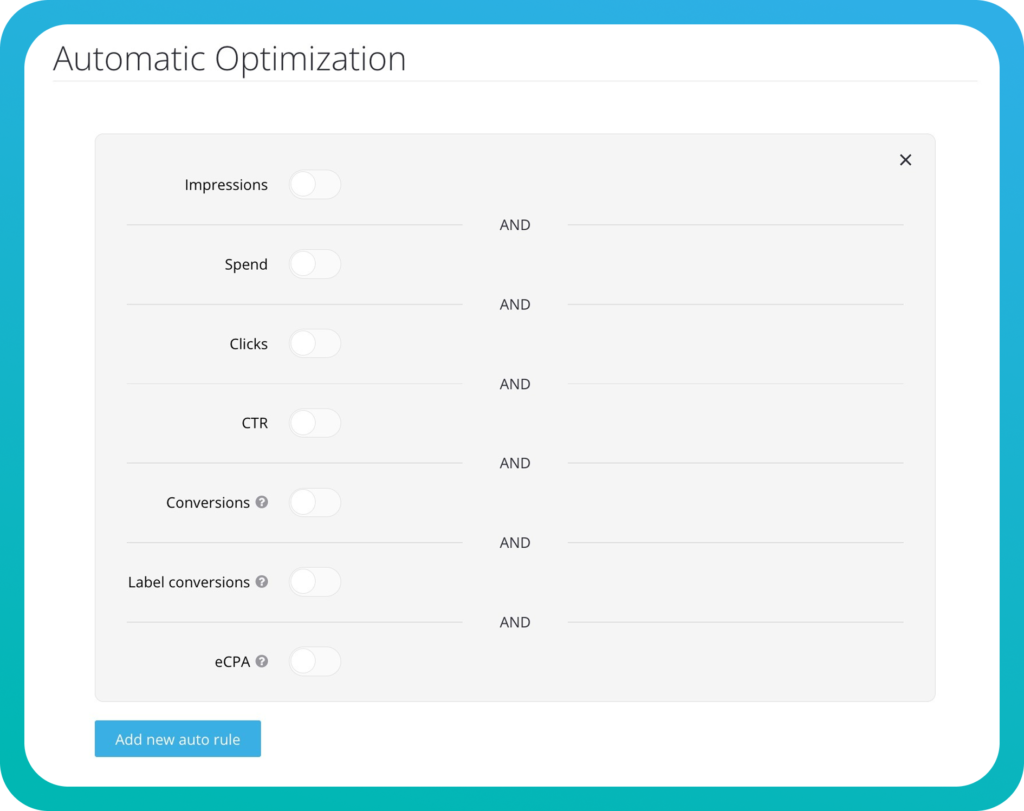
For each metric, choose whether you want it to be higher or lower, and set a threshold.

One thing that often confuses people: if you enable multiple conditions, all of them must be true at the same time. This uses AND logic, not OR. If you want either condition to trigger the action, you’ll need to set up separate rule blocks. More on that below.
Read our article on how to increase sales in your online store by buying traffic on HilltopAds:

The Edge Case Everyone Misses: Zero Conversions = Zero eCPA
Here’s something important to remember: if a zone has impressions but no conversions, its eCPA is considered zero. It’s not infinite, not undefined. Zero.
That means a rule like “eCPA higher than $5” will never catch a zone that’s spent money and converted nothing. Mathematically, zero is never higher than five. If you’re trying to catch dead zones, you need a Spend or Impressions condition alongside eCPA – eCPA alone won’t do it.
A Few Other Things to Keep in Mind
- A rule with no conditions enabled will never fire – you have to turn on at least one
- A zone with zero activity during the period has all its metrics at zero, so spend or eCPA conditions won’t catch a completely inactive zone
- A rule can only action a given zone once per period – after it fires, it won’t fire again on that same zone until the full period has passed

Register with HilltopAds and get
- Advanced targeting options
- Direct traffic sources
- Self-serve platform
- Fully-managed service
- Postback tracking
Putting It Into Practice: Rule Examples
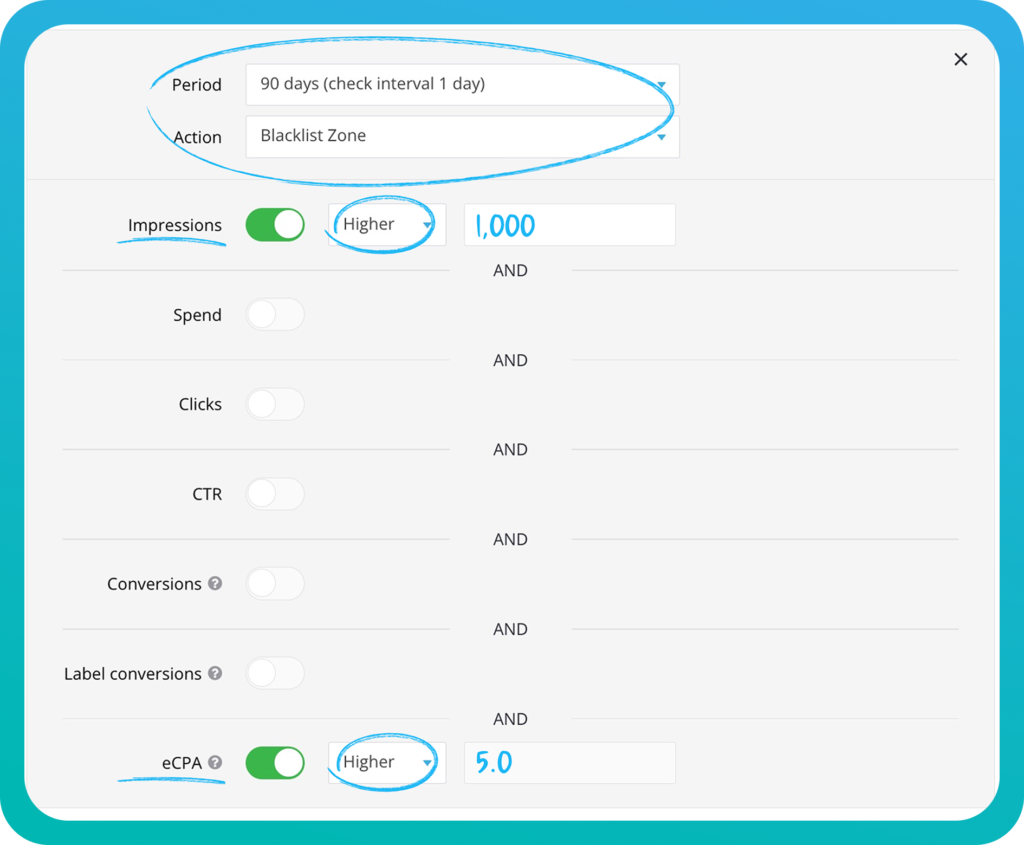
Basic cleanup – spend without results. Block zones that racked up over 1,000 impressions and an eCPA above $5.00 over 90 days. Just remember the edge case above: pair this with a Spend condition if you also want to catch zones with zero conversions.
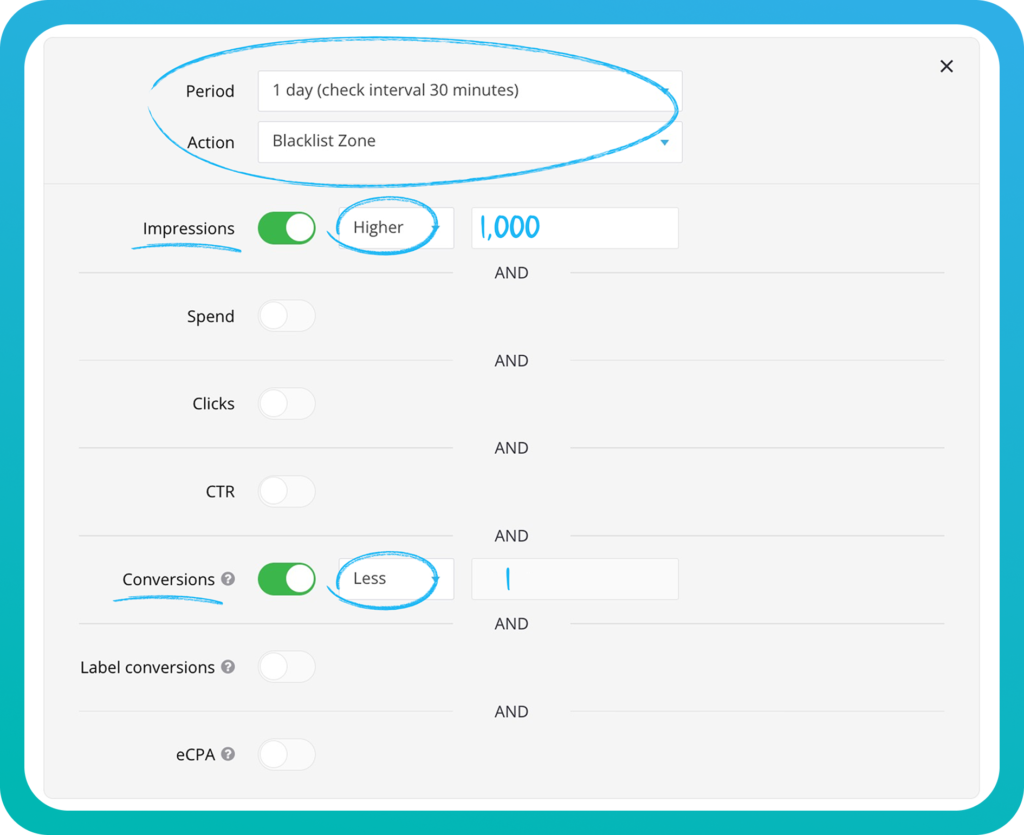
Fast, volume-based cleanup. There is no sense in keeping a zone that delivers at least 1,000 impressions per day with no conversions. You do not need to spend too much money to know that this way is a losing zone. Just by doing impressions, you are risking burning a lot of money for no conversions.
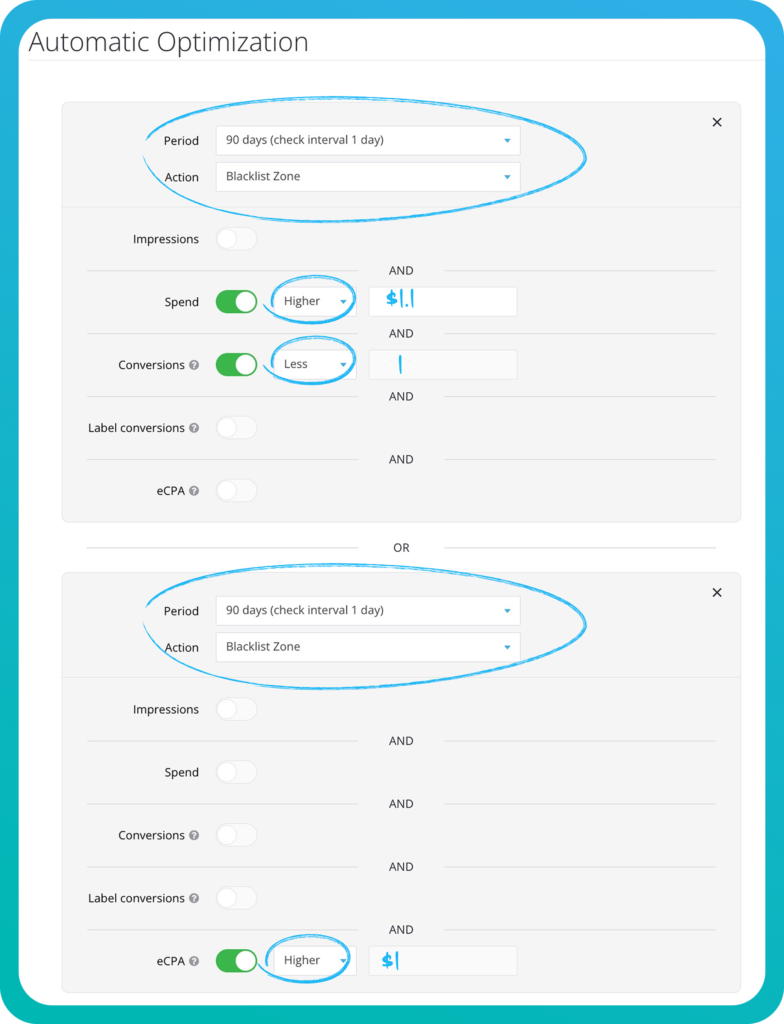
Use OR logic when there are two failure modes in parallel. Imagine a situation where you are trying to bring a cost-per-action of $1. Then you can combine two rule blocks with OR: Say your target CPA is $1.00. Block 1 catches zones that spent over $1.10 with zero conversions (dead zones), while Block 2 catches zones with an eCPA above $1.00 (zones that convert, just too expensively). Since it’s OR, only one condition needs to be true – you’re covering two different failure patterns in a single rule instead of running two separate ones.
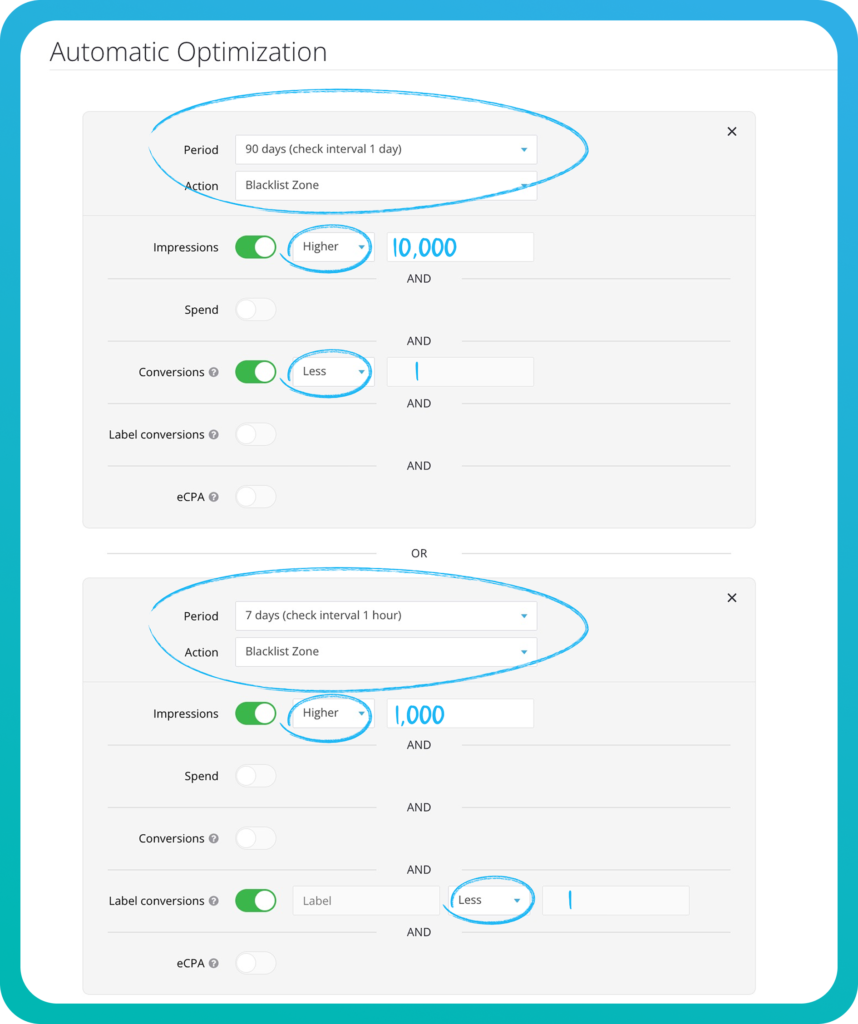
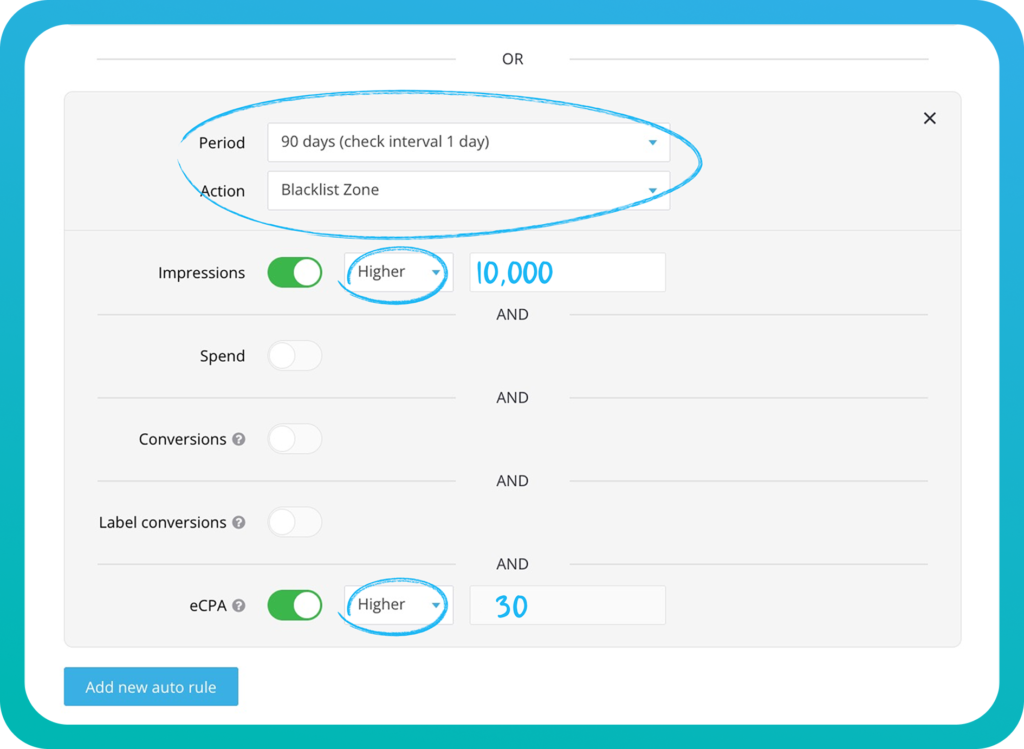
Multi-layered cleanup for large zone counts. If your zone list is huge and there is no option for a daily manual review, then stacking multiple blocks might be a good idea. For example, a very conservative blocking (only if the campaign was active at least a whole month with over 10,0000 impressions per day and no conversion), a fast early-warning check (campaign served at least 1000 plus daily over 10 days and zero registration conversions) and cost-efficient verification check (at least 10,000+ impressions over 90 days at eCPA above your target). Every layer helps detect problems at different timings so nothing goes through by accident.
Read success stories from advertisers using HilltopAds’ auto-optimization tools:


The Takeaway
Auto Optimization, in principle, goes more than just one-time setting and leave it alone. The idea is to have you be a strategist rather than a zone checker guy every day. Repetitive chores are handled by automation. All you need is to specify what “bad” is related to your deal and target CPA.
It’s best to begin by setting only one condition with one action. Once you understand how your zones operate, then you can implement more complex and multi-rule blocks. Always mind the possibility of eCPA-zero. It’s the most frequent cause that explains why a rule is not picking up what you expected.
Getting your campaigns to be managed without your direct involvement? Well, the time has come! Clicking on a HilltopAds dashboard to setup your first auto optimization rule will lead you straight towards that goal.